
We spend Christmas (2021) in the old kitchen of the ruin. Where we continued with our interior walls experiments. With the old little wood stove, we manage to heat it to almost 10˚C degrees there (while it is 5˚C outside). A lovely temperature to work in.
Then & Now


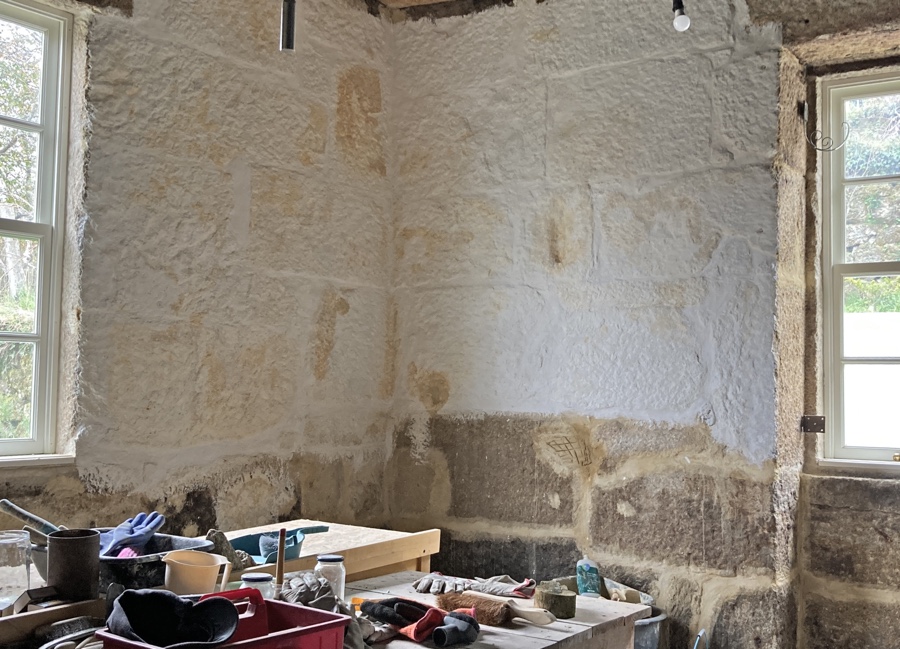
In earlier posts, we wrote about the hideous, burnt old kitchen, which intermittently we are getting gradually less dark. It is our testing laboratory: we are learning how to work with granite stone walls. And how best to tackle the dirty dark soot and how much time we spend doing it.

Caked-on soot traces
The plan for Christmas was to repair the joints. We first raked out the bad joints and then filled the spaces between the large granite blocks with lime mortar. And since we were already working with lime mortar, we could also do some tests for the finishing layer of the walls.
The extra difficulty is that the granite also has traces of soot caked on it. If you plaster or point over this, there is a good chance that the soot will seep through and cause stains on the wall. We found plenty of tips on the internet, but, you only know if it works for sure once you’ve tried it! In any case, it is important to remove as much soot as possible.

Cleaning and render tests
We tested many methods to remove the soot: Brushing (by hand or electrically) does not work, as you cannot remove the grease of soot with it. Using the electric chisel, Nuño was able to remove the soot from the granite stones, but it was heavy and made a terrible noise.
Another possibility would be to use a high-pressure cleaner, possibly in combination with chlorine. But then everything gets soaking wet. Scrubbing with St.Marc worked well in principle, but was very labor-intensive and it also got everything wet.
In the end, we treated a couple of soot spots with a primer, to seal the soot.
We then tested four spots with a layer of lime plaster: 1th with primer, 2nd only with chiseling, 3th with St. Marc, and 4th without treatment.
After three weeks of drying, no soot had penetrated through at any of the locations.
That was encouraging and we dared to start pointing the joints. To be sure, we treated all remaining soot spots with primer. We grouted used a mortar in a ratio of 1 part lime (NHL5) to 4 parts sand. We used special sand called ZORRA. We got this tip from a structural engineer. Zorra is terra cotta in color and is said to have a better thermal value than sand. I tried to find out more about it on the internet, but I couldn’t. I did find that ‘Zorra’ in Portuguese means female fox and is sometimes also used for a lascivious woman… But that aside.
Zorra-based lime mortar is super-easy to work with; better than the grey sand we used previously. It results in joints of a bit (urine)yellowish color, which is why we continue to use grey sand outside.

Chalk paint test
While we were pointing, we saw a picture of a house where the granite walls had been painted over directly with chalk paint. That looked nice. So after pointing the joints, we made a test with an old can of Corical chalk paint. But what came straight through? Soot stains! Fortunately, we didn’t like it enough as a finish either.
So, next Christmas, we’re going to plaster.
Because meanwhile spring has arrived here and we can go outside again.
Like to read more about lime mortar, its advantages, application and techniques?
I found these pdf’s of useful books on the internet:
https://www.historicenvironment.scot/archives-and-research/publications/publication/?publicationId=85ced9f0-474d-4ec6-8dd6-a59100fc306f
https://southsomerset.gov.uk/media/1380/lime_book_2010_revised_draft.pdf
As one whose main construction experience was in the US with wood-framing, I have been trying to learn more about the ubiquitous masonry work here in Portugal. I read your blog and am fascinated by your “source material” regarding lime and its’ uses. I lived in Maine for a long time and had read about the various wooden sailing ships ‘way back when carrying lime in their holds to distant markets, and the dangers of a leaking boat and storms thus letting it get wet… What an amazing evolution, and kudos to you for sticking-with-it to have it done properly. Cheers! 🙂
Olá Bob, We did a lot of lime research, but still your reference to the wooden ships carrying lime was new to us. Thanks for that and for your appreciation of our work. Boa Sorte with your own project!
Thank you for sharing:-)